
| 일 | 월 | 화 | 수 | 목 | 금 | 토 |
|---|---|---|---|---|---|---|
| 1 | ||||||
| 2 | 3 | 4 | 5 | 6 | 7 | 8 |
| 9 | 10 | 11 | 12 | 13 | 14 | 15 |
| 16 | 17 | 18 | 19 | 20 | 21 | 22 |
| 23 | 24 | 25 | 26 | 27 | 28 | 29 |
| 30 |
- js 댓글수정
- 3way handshake
- 화살표함수
- 콜백함수
- React 기본설정
- js 생성자 함수
- JS DOM
- typescript
- Git
- js 댓글
- js 무한루프 슬라이드
- Linux 기본
- node js 기본
- js 게시판
- nodejs 게시판
- js DOM 기초
- 배열 메서드
- Rebase
- React 자습서
- js 메서드
- js 함수 #함수
- css #css기초
- js 함수 표현식
- Linux 사용자
- js 로또
- node js 설치
- Object.keys
- GitHub
- branck 합치기
- js로또 만들기
- Today
- Total
개발 노트
http tcp 미완.2 본문
HTTP 동작방식
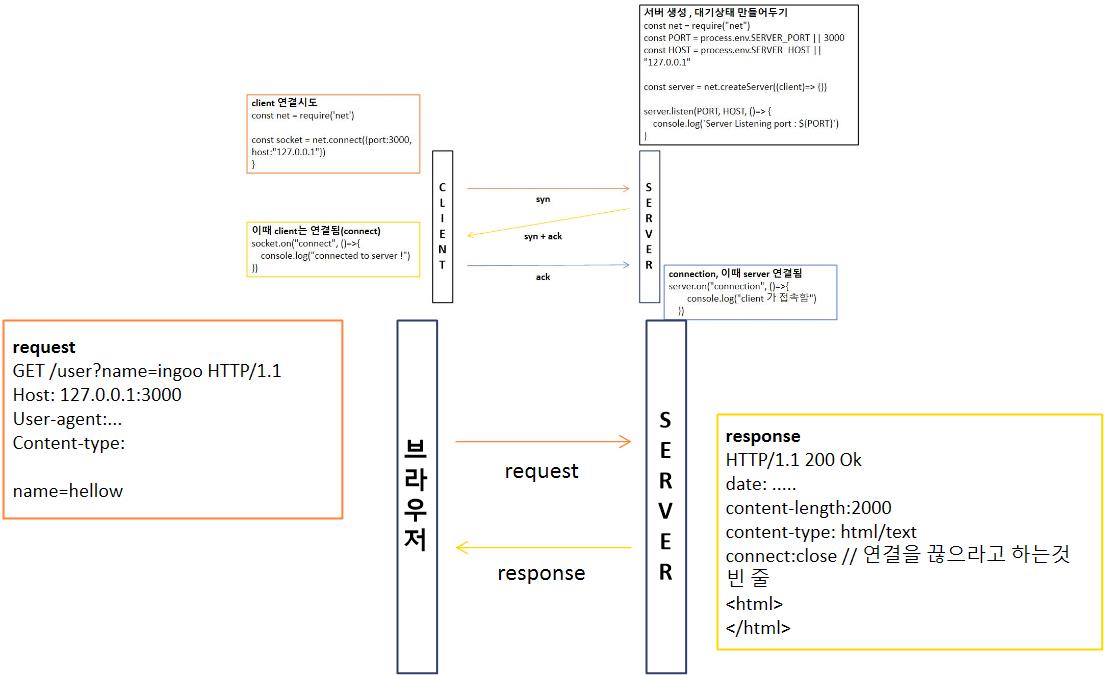
브라우저에서 URI를 입력시 동작 형태 > 브라우저에서 uri를 입력하면 > 3wayhandshake가 한 번 일어나고
http 프로토콜이 일어남.
브라우저에서 request message를 보내면 서버에서 알맞는 response message를 던져줘야 한다. 그것이 서버의 역할이다.
(client > server : request 요청을 함 // 이 때 서버는 무조건 response를 준다. 데이터가 없으면 없다라고 쥐어짜서 준다.)
요청 응답은 크게 2가지 형태로 읽어야 한다. 빈칸을 기준으로
head부분 body부분으로 나눠서읽는다.
request header + request body

Start line
GET /user?name=hellow HTTP/1.1 //POST를 쓰면 그냥 POST로 입력이 되는것
[요청메서드] [요청 URI] [HTTP 프로토콜 버전]
요청 메서드(Request Method)
GET : 데이터 요청의 의미로 사용합니다.
POST : 데이터 입력의 의미로 사용.
PUT : 데이터 수정의 의미
DELETE : 데이터 삭제하기 위해서 사용
OPTIONS : 웹 서버가 지원하는 메서드의 종류 요청
요청 URI(PATH)
HOST를 제외한 나머지 URI를 적음.
HTTP 프로토콜 버전
HTTP버전이 1.0 1.1 2.0이 있는데 우리는 1.1만 쓴다.
content-Type은 알아야한다.(x-www-form-urlencoded, json)
body
요청 데이터를 넣는 공간
res message
HTTP/1.1 200 Ok
Data : ....
Content-Length: 6821
Content-Type: text/html
<html>
...내용
</html>
start line
http 프로토콜 버전
요청메세지와 같음
네트워크 상태코드
1xx
2xx : 대부분 성공의 의미 get > 200 post > 300
3xx :
4xx : 페이지가 없음, 오류
5xx : 서버터짐
ok 상태 메세지
server.js
const net = require("net")
const resFn = require("./lib/res")
const reqFn = require("./lib/req")
const PORT = process.env.SERVER_POST || 3000
const HOST = process.env.SERVER_HOST || "127.0.0.1"

const server = net.createServer((client)=>{
    client.setEncoding("utf8")

    client.on("data", (chunk)=>{
        console.log(chunk)
        const res = resFn(client)
        const req = reqFn(chunk)

        if(req.method === "GET" && req.path === '/'){
            res.send('<h1>응답~~~</h1>')
        } else if (req.method === "GET" && req.path === "/list"){
            res.sendFile('list.html')
        } else if (req.method === "GET" && req.path === "/write"){
            res.sendFile('write.html')
        } else if (req.method === "GET" && req.path === "/update"){
            res.sendFile('update.html')
        } else if (req.method === "GET" && req.path === "/view") {
            res.sendFile('view.html')
        }
    })
})

server.on("connection", ()=>{
    console.log("connected")
})

server.listen(PORT,HOST,()=>{
    console.log("server start")
})
브라우저의 경우 url을 쳤을 때 데이터를 서버에 준다 / > 이후 서버에서 브라우저로 응답을 해 준 후
브라우저가 더 이상 받을 데이터가 없으면 엔드를 해버리고 연결을 끊는다.
서버가 브라우저에게 던지는 것 > reponse
브라우저가 서버에게 던지는 것 > request
res.js
const fileRead = require('./template')

const message = (content)=>{
    const body = Buffer.from(content)

    return `HTTP/1.1 200 OK
Connection:Close
Content-type:text/html; charset=UTF-8
Contetn-Length:${body.length}

${body.toString()}`
}

module.exports = (client) => {
    return {
        send:(body)=>{
            const response = message(body)
            client.write(response)
        },
        sendFile:(filename)=>{
            const body = fileRead(filename) // string html에 있는 모든 내용
            const response = message(body)
            client.write(response)
        }
    }
}
Buffer > 2진수 데이터이다 -> 16진수로 담아서 보여준다
이 16진수 데이터를 보여주기 위해선 다시 변경을 해줘야한다.
문자집합(아스키코드, 유니코드(한글일경우)) utf8(유니코드)
buffer로 변환되어있는 파일이기 때문에 인코딩을 해서 다시 변환을 시켜줘야 한다.
data.toString() > 데이터라는 버퍼 안에서 인코딩을 하는 것 . ()안에 인자값을 넣어주어야한다.
hex = 스트링으로 다 붙여서 붙여준다.
urf8 = 원래 글자로 바꿔준다.
setEncoding("") 인자값을 넣어주면 기본적으로 인코딩을 해서 받는다.
fireRead를 통해 template에 작성해놓은 경로를 지정 할 수 있는 함수를 불러온다.
filename 이 속한곳 까지의 경로를 붙이고 fileRead를 통해 body에 넣을 수 있는 상태로 만들어 준 후 client.write을 통해 보내준다.
req.js
// string --> object
// TODO : startline
// TODO : header, body 분리하기
// TODO : header, body 객체 만들기
const getQuery = (queryString)=>{
    if(queryString === undefined) return null
    return queryString.split("&").map(v=>v.split("=")).reduce((acc, value)=>{
        const [key, val] = value
        acc[key] = val
        return acc
    },{})
}

const bodyparser = (body, type)=>{
    if (type === undefined) return null
    if (type.indexOf('application/json') !== -1) return JSON.parse(body)
    if (type.indexOf("application/x-www-form-urlencoded") !== -1) return getQuery(body)
    return body
}

const getMessage = (line) => {
    let flag = false
    let body = ''
    for (const key in line){
        if (flag) body = line.splice(key).map(v=>v.trim()).join("")
        if(line[key] === "") flag = true
    }
    line.pop()

    const headers = line.map(v=>v.split(":")).reduce((acc,value)=>{
        const [key, val] = value
        acc[key] = val
        return acc
    },{})

    body = bodyparser(body, headers["Content-Type"]) // {}
    return [headers, body]
}

const parser = (message)=>{
    const header = message.split("\r\n") // 한줄한줄 배열로 만들기
    const [method, url, version] = header.shift().split(' ') // 맨 위에 줄 한줄 빼는것
    const [path, queryString] = url.split("?")
    const query = getQuery(queryString)

    const [headers, body] = getMessage(header)

    return {method, url, version, path, queryString, query, headers, body}
}

console.log(parser(msg))

module.exports = parser
parser 부분이 메인이다. parser함수를 넘겨줌으로 인해 req메세지를 해석 할 수 있고, 객체로 저장하여
method path 값 등을 뽑아 올 수 있다.
template.js
const fs = require("fs")
const path = require("path")
const DEFAULT_DIR = "../views"

module.exports = (filename) => {
    const target = path.join(__dirname, DEFAULT_DIR, filename)
    const readline = fs.readFileSync(target, "utf8")
    return readline
}
'nodejs' 카테고리의 다른 글
| nodejs 게시판 (0) | 2022.12.20 |
|---|---|
| Express (1) | 2022.12.14 |
| nodejs [3way handshake] (0) | 2022.12.07 |
| nodejs [내장객체,케싱,내장모듈,osi7계층] (0) | 2022.12.06 |
| nodejs (0) | 2022.12.05 |


